服务端开发复习
建立开发环境
依赖
spring-boot-devtools
开发期工具
- 代码变更后应用会自动重启(需要借助 IDE 的自动编译)
- 当面向浏览器的资源(如模板、JavaScript、样式表)等发生变化时,会自动刷新浏览器
- 应用会暴露 LiveReload 端口,日志如:
LiveReload server is running on port 35729 - 需要安装 VSCode 插件 LiveReload (IntelliJ IDEA 要做的配置见下页 ppt)
- 需要安装浏览器插件:LiveReload,并打开
- 应用会暴露 LiveReload 端口,日志如:
- 自动禁用(页面渲染的)模板缓存
- 如果使用 H2 数据库,则内置了 H2 控制台。访问:http://localhost:8080/h2-consle
只是在运行期使用,依赖范围:Runtime;与编译无关
spring-boot-starter-web
spring-boot-starter-thymeleaf
源代码仓库管理
- 也称为版本控制(version control)系统,常用工具有:GitLab、SVN(Subversion)、Bitbucket 等
- 需纳入版本控制的有:功能代码、测试代码、测试脚本、构建脚本、部署脚本、配置文件等
- 从暂存区(index)提交到本地仓库(Repository)使用的命令是
git commit
依赖注入
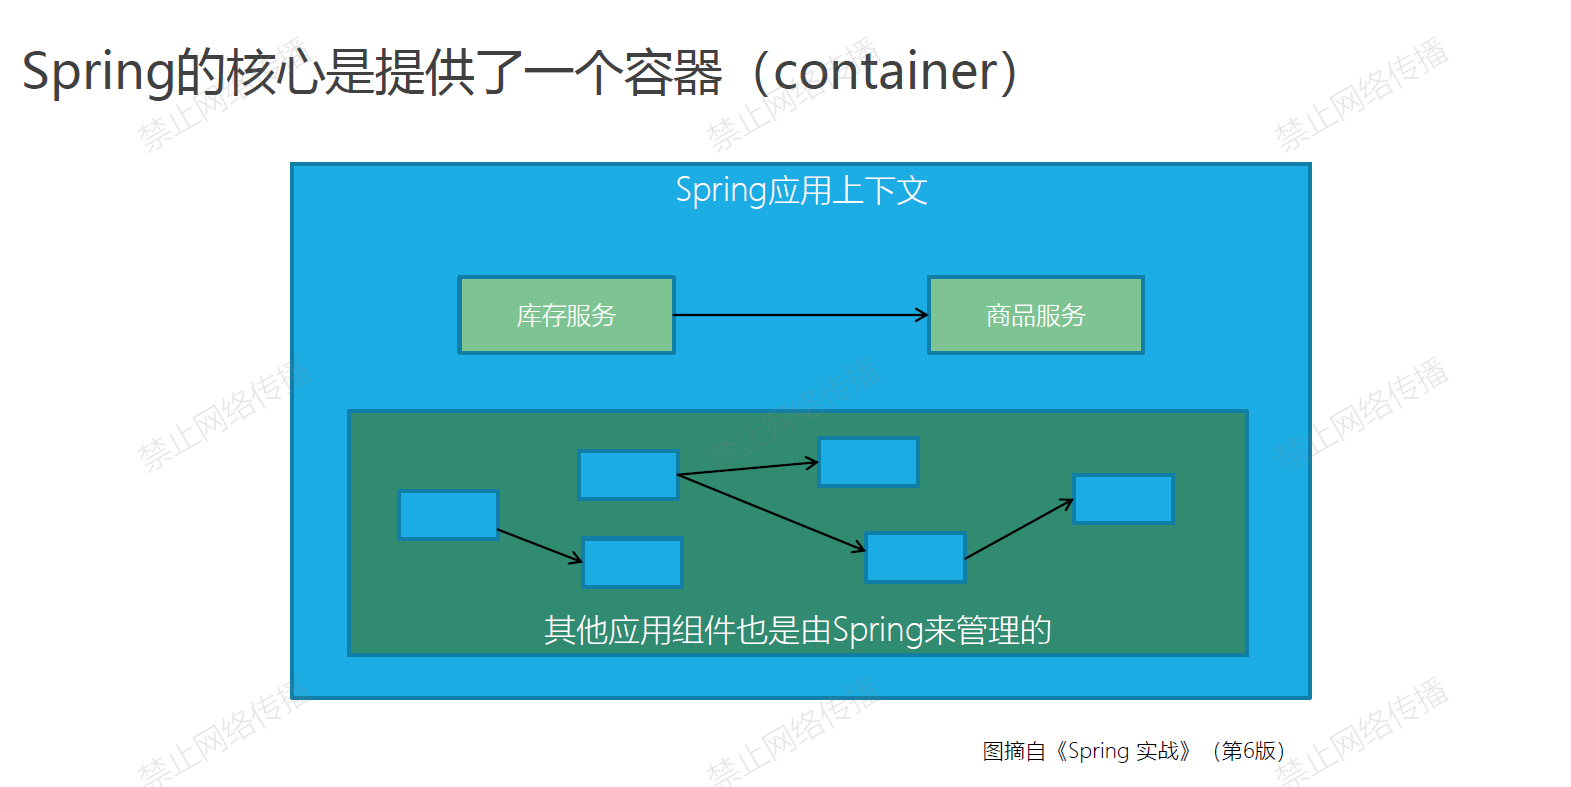
依赖注入(Dependency Injection),又叫控制反转(IoC)
核心技术
- DI (Dependency Injection):保留抽象接口,让组件(Component)依赖于抽象接口,当组件要与其他实际的对象发生依赖关系时,由抽象接口来注入依赖的实际对象
- AOP (Aspect Oriented Programming):通过预编译方式和运行期间动态代理实现程序功能的统一维护的一种技术。利用 AOP 可以对业务逻辑的各个部分进行隔离,从而使得业务逻辑各部分之间的耦合度降低,提高程序的可重用性,同时提高了开发效率
Spring 的核心是提供了一个容器(container)
Spring 配置方案
- 自动化配置
- 组件扫描(component scanning)
@Configuration@ComponentScan@Component:实例化当前类,在上下文中创建对象
- 自动装配(autowiring)
@Autowired:把上下文里的另外一个对象注入到当前对象,并建立依赖关系- 用在构造器
- 用在属性
Setter方法 - 用在(私有)属性
required=false
- 组件扫描(component scanning)
- JavaConfig
- XML配置
Bean 的作用域
@Scope 可以与 @Component 和 @Bean 一起使用,指定作用域
Singleton,单例,不使用@Scope时默认,在整个应用中,只创建 bean 的一个实例Prototype,原型,每次注入或者通过 Spring 应用上下文获取的时候,都会创建一个新 bean 实例Session,会话,在 Web 应用中,为每个会话创建一个 bean 实例Request,请求,在 Web 应用中,为每个请求创建一个 bean 实例
使用会话和请求作用域
|
AOP 面向切面编程
AOP术语
- 通知(Advice):切面做什么以及何时做
@Before@After@AfterReturning@AfterThrowing@Around
- 切点(Pointcut):何处
- 切面(Aspect):Advice 和 Pointcut 的结合
- 连接点(Join point):方法、字段修改、构造方法(Spring 只能在方法处切面)
- 引入(introduction):引入新的行为和状态
- 织入(Weaving):切面应用到目标对象的过程(Spring 只能在运行期织入,使用代理对象)
|
@Controller、@Service 和 @Repository 三个注解本身有 @Component 的实例化效果。
|
|
AspectJ 切点指示器(pointcut designator)
|
//限定注解 |
Web开发框架(Web MVC)
Lombok
依赖
<dependency>
	<groupId>org.projectlombok</groupId>
	<artifactId>lombok</artifactId>
</dependency>
编译期后就不需要了,要排除
<groupId>org.springframework.boot</groupId>
	<artifactId>spring-boot-maven-plugin</artifactId>
	<configuration>
		<excludes>
			<exclude>
				<groupId>org.projectlombok</groupId>
				<artifactId>lombok</artifactId>
简化 Java 代码的书写,提供一些注解,自动生成一些方法。
另外需要安装
IntelliJ IDEA插件Lombok
Spring MVC的请求映射注解
@RequestMapping(通用请求,可以放在类或者方法上)@GetMapping@PostMapping@PutMapping@DeleteMapping@PatchMapping
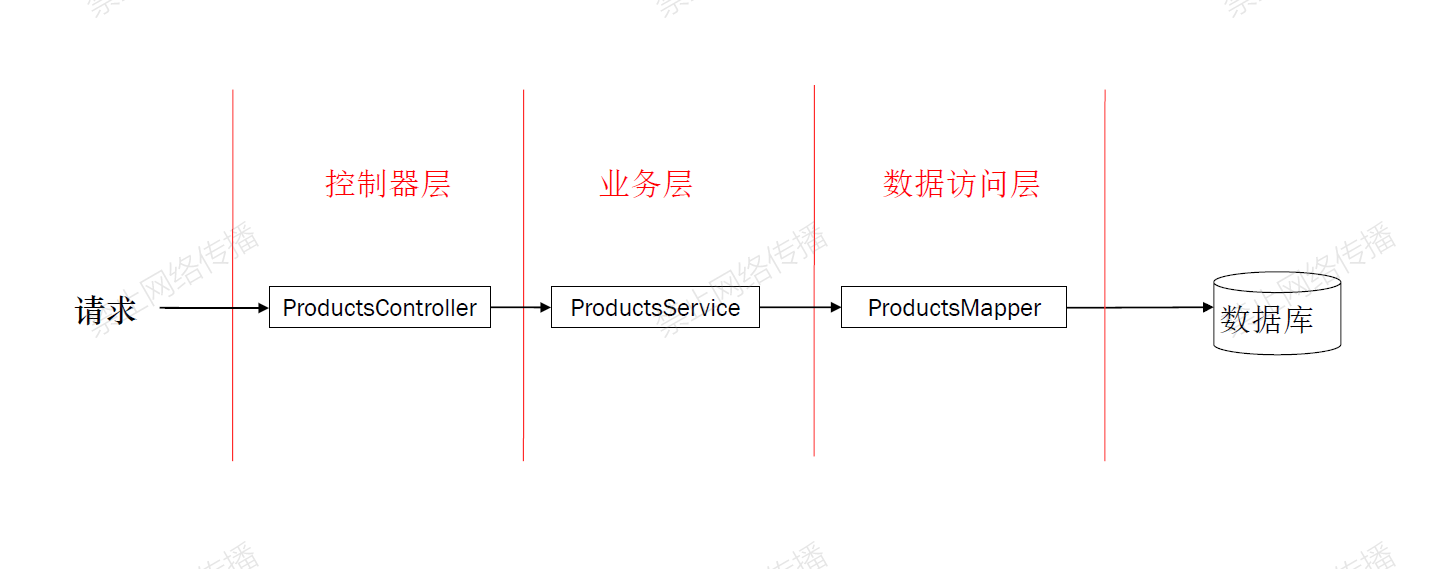
Spring Web 开发框架的分层
客户端请求参数分类:
路径参数,
@PathVariable请求参数(查询参数),
@RequestParam表单参数,应用于前后端不分离的传统场景,默认,对应 model 对象,可以使用
@Valid校验json请求体,应用于前后端分离的场景,使用@RequestBody把json格式转成 Java 对象;@ResponseBody,把 Java 对象转成json格式控制器获取客户端请求 → 业务层处理(数据持久化)→ 数据访问层
数据访问层 → 业务层(返回结果)→ 控制器 →
- 前后端不分离:控制器把返回数据作为 Model 的属性 → 返回一个视图名 → 通过第三方的页面渲染把 Model 数据渲染到页面中 → 返回 HTML 页面
- 前后端分离:控制器返回一个 Java 对象,在方法上加
@ResponseBody注解转化成json格式;或者在类的上方加注解@RestController
Spring Data JDBC、JPA
| 特点 | JdbcTemplate | Spring Data JDBC | JPA |
|---|---|---|---|
| 实现具体类 | 需要 | 不需要,只要写明继承关系 | 不需要,只要写明继承关系 |
| 定义实体类和数据库表的映射关系 | 不需要 | 需要 | 需要 |
| 程序员维护表之间的关系 | 需要 | 不需要 | 不需要 |
| 显式提供表结构(建表 SQL 脚本) | 需要 | 需要 | 不需要,可以自动推断 |
使用 JdbcTemplate
<dependency> |
- 解决
RawJdbcIngredientRepository样板式代码的问题,只需要提供查询逻辑 - 需要实现具体类
JdbcIngredientRepository而其他两种方法不用 - 需要提供
src/main/resources/schema.sql文件作为表结构的定义(建表脚本)
|
使用 Spring Data JDBC
<dependency> |
- 需要定义实体类和数据库表的映射关系
- 不需要实现具体类,只需要写好继承关系
- 需要提供
src/main/resources/schema.sql文件作为表结构的定义(建表脚本)
public interface IngredientRepository |
import org.springframework.data.annotation.Id; |
使用 Spring Data JPA
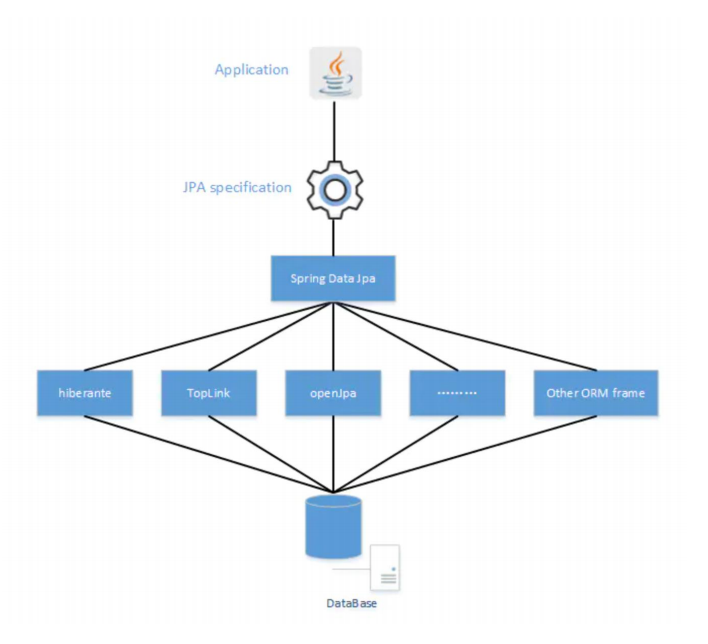
- JPA:Java Persistence API
- JPA 的宗旨是为 POJO 提供持久化标准规范
- JPQL 是一种面向对象的查询语言
<dependency> |
- 需要定义实体类和数据库表的映射关系
- 不需要实现具体类,只需要写好继承关系
- 依据实体类推断表结构,不需要建表脚本
- 可以自定义查询方法
public interface IngredientRepository |
import javax.persistence.Entity; |
自定义的查询方法
定义查询方法,无需实现
领域特定语言(domain-specific language,DSL),spring data的命名约定
查询动词 + 主题 + 断言
查询动词:get、read、find、count
例子:
List<TacoOrder> findByDeliveryZip( String deliveryZip );
声明自定义查询
不符合方法命名约定时,或者命名太长时
List<TacoOrder> readOrdersDeliveredInSeattle( );
Jpa、Hibernate、Spring Data Jpa 三者之间的关系
- JPA 的宗旨是为 POJO 提供持久化标准规范
- Hibernate 作为厂家实现了这一规范
Spring Security
<dependency> |
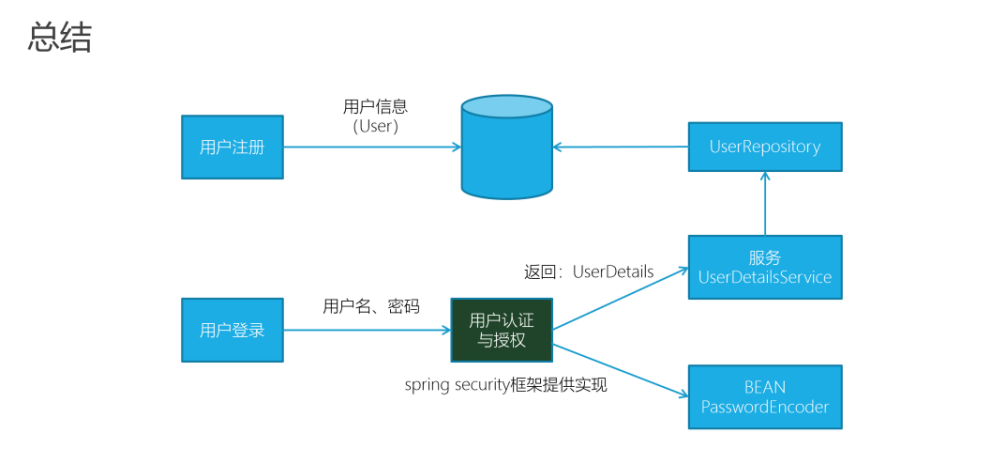
用户信息存储
- 内存用户存储
- JDBC 用户存储
- LDAP 用户存储
总结
保护 web 请求
public SecurityFilterChain filterChain(HttpSecurity http)权限管理
protected void configure(HttpSecurity http) throws Exception {
http
.authorizeRequests()
.antMatchers("/design", "/orders").access("hasRole('USER')")
.antMatchers("/", "/**").access("permitAll")
.and()
.formLogin()
.loginPage("/login")
.and()
.logout()
.logoutSuccessUrl("/")
// Make H2-Console non-secured; for debug purposes
.and()
.csrf()
.ignoringAntMatchers("/h2-console/**")
// Allow pages to be loaded in frames from the same origin; needed for H2-Console
.and()
.headers()
.frameOptions()
.sameOrigin()
;
}创建自定义登录页
- 当需要认证时转向的登录页:
.loginPage("/login") - 视图控制器,定义 login 请求对应的视图:
registry.addViewController("/login"); - 登录的 post 请求由 Spring Security 自动处理,名称默认:
username、password,可配置
- 当需要认证时转向的登录页:
Docker使用
docker run命令
-d:后台运行容器,并返回容器 ID-i:以交互模式运行容器,通常与-t同时使用-t:为容器重新分配一个伪输入终端,通常与-i同时使用-p:指定(发布)端口映射,格式为:主机(宿主)端口 : 容器端口-P:随机端口映射,容器内部端口随机映射到主机的高端口--name="nginx-lb":为容器指定一个名称-e username="ritchie":设置环境变量--env-file=c:/temp1/t1.txt:从指定文件读入环境变量--expose=2000-2002:开放(暴露)一个端口或一组端口;--link my-mysql:taozs:添加链接到另一个容器-v c:/temp1:/data:绑定一个卷(volume)--rm退出时自动删除容器- 其他命令:cat /etc/hosts:查看当前容器 IP 地址
docker --help |
容器镜像构建与编排
Dockerfile文件的指令
FROM:指定基础镜像,必须为第一个命令RUN:构建镜像时执行的命令ADD:将本地文件添加到容器中 tar 类型文件会自动解压COPY:功能类似 ADD ,但是不会自动解压文件CMD:构建容器后调用,也就是在容器启动时才进行调用ENTRYPOINT:配置容器,使其可执行化。配合 CMD 可省去 “ application”,只使用参数,用于 docker run 时根据不同参数执行不同功能LABEL:用于为镜像添加元数据ENV:设置环境变量EXPOSE:指定与外界交互的端口,容器内的端口号 docker run 时加 P 则会映射一个随机号(宿主机)VOLUME:用于指定持久化目录 docker run 时如果没有指定挂载目录,会创建一个 volumeWORKDIR:工作目录,类似于 cd 命令USER:指定 运行容器时的用户名或 UIDARG:用于指定传递给构建运行时的变量ONBUILD:用于设置镜像触发器
注意:ADD 和 COPY 的区别;CMD 和 ENTRYPOINT 不可以互相替代
Docker build
docker build [OPTIONS] PATH | URL | - |
如何编写最佳的 Dockerfile:https://zhuanlan.zhihu.com/p/26904830
.dockerignore文件(构建镜像时排除一些不需要的文件)- 容器只运行单个应用(多个应用不利于管理)
- 将多个
RUN指令合并为一个(镜像是分层的,将相似变化频率的镜像放在一起) - 基础镜像的标签不要用
latest - 每个
RUN指令后删除多余文件 - 选择合适的基础镜像(alpine 版本最好)
- 设置
WORKDIR和CMD - Docker 健康检查 HEALTHCHECK 的使用方法:https://zhuanlan.zhihu.com/p/386986915
服务编排工具,docker-compose
Compose 项目是 Docker 官方的开源项目,负责实现对 Docker 容器集群的快速编排
一个单独的 docker compose.yml 模板文件( YAML 格式)来定义一组相关联的应用容器为一个项目(project)
Compose 的默认管理对象是项目,通过子命令对项目中的一组容器进行便捷地生命周期管理
Compose 中有两个重要的概念:
- 服务(service):一个应用的容器(可能会有多个容器),实际上可以包括若干运行相同镜像的容器实例
- 项目(project):由一组关联的应用容器组成的一个完整业务单元,在
docker.compose.yml文件中定义
使用微服务架构的系统一般包含若干个微服务,每个微服务一般部署多个实例。如果每个服务都要手动启停,那么效率低,维护量大
YAML 文件
使用缩进表示层级关系,不允许使用 Tab 键,只允许使用空格
#表示注释,从这个字符一直到行尾,都会被解析器忽略。对象,键值对,使用冒号结构表示
animal: pets
hash: { name: Steve, foo: bar }
数组,一组连词线开头的行,构成一个数组
- Cat
- Dog
- Goldfish
#行内表示法:
animal: [Cat, Dog]
docker-compose常用命令
## docker-compose常用命令 |
k8s使用
k8s中的资源
- namespaces
- Pods
- ReplicaSet
- Deployment
- Service
- Ingress
- configmap
- secrets
- serviceaccounts
- DaemonSetf
Pod
Pod 是 Kubernetes 调度的最小单元
一个 Pod 可以包含一个或多个容器,因此它可以被看作是内部容器的逻辑宿主机。Pod 的设计理念是为了支持多个容器在一个 Pod 中共享网络和文件系统。
- PID 命名空间: Pod 中不同的应用程序可以看到其他应用程序的进程 ID
- network 命名空间: Pod 中多个容器处于同一个网络命名空间,因此能够访问的 IP 和端口范围都是相同的。也可以通过 localhost 相互访问
- IPC 命名空间: Pod 中的多个容器共享 Inner process Communication 命名空间,因此可以通过 SystemV IPC 或 POSIX 进行进程间通信
- UTS 命名空间: Pod 中的多个容器共享同一个主机名
- Volumes Pod 中各个容器可以共享在 Pod 中定义分存储卷(Volume)
如何将pod或service的端口快速映射到本机端口(调试用)
kubectl port-forward pod/myspittr 8081:8080
访问:http://localhost:8081/spittr/
kubectl port-forward service/demo 8081:80创建服务
kubectl expose pod myspittr --port 8080
kubectl get svc
kubectl delete service myspittr
创建ingress
kubectl create ingress myspittr --class=nginx --rule=www.demo.com/*=myspittr:8080
访问:http://www.demo.com/spittr/
kubectl delete ingress myspittr
kubectl run -i -t --rm=true mycurl --image=curlimages/curl:latest --restart=Never --command --sh
Label、Service 和 Pod 之间的关系
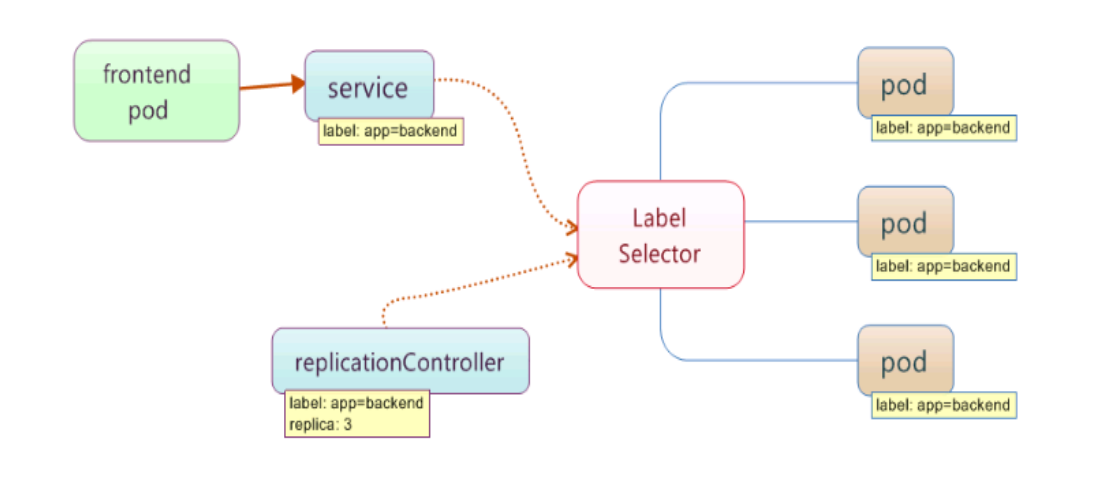
- 服务的三种可访问方式:服务名;服务集群 IP;Pod IP
- Pod名不可访问
Deployment
更新镜像重部署
kubectl set image deployment/spittr spittr=spittr:1.0
扩容
kubectl scale deployment spittr --replicas 2
自动伸缩
kubectl autoscale deployment spittr --min=10 --max=15 --cpu-percent=80
控制伸缩的个数区间查看历史版本
kubectl rollout history deployment/spittr
回滚到前一个版本
kubectl rollout undo deployment/spittr
K8s Service 和 Nacos Service 的异同点
- 共同点:通过服务名访问多个服务
- 不同点:
- K8s 的服务是 Pod 层级的,它与 K8s 的其他资源(Ingress,Pod)是配合使用的
- Nacos 的服务是服务层级的,与开发框架相关
- 可以二选一
- 服务的部署、升级、重启等还是需要借助于底层的 K8s
REST服务、微服务开发与部署
单体应用程序
- 数据库的表对所有模块可见
- 一个人的修改整个应用都要重新构建、测试、部署
- 整体复制分布式部署,不能拆分按需部署
微服务架构模式的特征
- 应用程序分解为具有明确定义了职责范围的细粒度组件
- 完全独立部署,独立测试,并可复用
- 使用轻量级通信协议,HTTP 和 JSON,松耦合
- 服务实现可使用多种编程语言和技术
- 将大型团队划分成多个小型开发团队,每个团队只负责他们各自的服务
响应头与响应体
状态行:由 HTTP 协议版本、状态码、状态码描述三部分构成,它们之间由空格隔开。
状态码:由 3 位数字组成,第一位标识响应的类型,常用的 5 大类状态码如下:
- 1xx :表示服务器已接收了客户端的请求,客户端可以继续发送请求
- 2xx :表示服务器已成功接收到请求并进行处理
- 3xx :表示服务器要求客户端重定向
- 4xx :表示客户端的请求有非法内容
- 5xx :标识服务器未能正常处理客户端的请求而出现意外错误
响应头:
- Location :服务器返回给客户端,用于重定向到新的位置
- Server 包含服务器用来处理请求的软件信息及版本信息 Vary :标识不可缓存的请求头列表
- Connection: 连接方式, close 是告诉服务端,断开连接,不用等待后续的请求了。 keep alive 则是告诉服务端,在完成本次请求的响应后,保持连接
- Keep Alive: 300 ,期望服务端保持连接多长时间(秒)
响应内容:服务端返回给请求端的文本信息。
消息转换器(Message conversion)
- 使用注解
@ResponseBody或类级@RestController作用:指定使用消息转换器,把 Java 对象转化成 json 文件 - 没有 model 和视图 控制器产生数据 然后消息转换器转换数据之后的资源表述 。
- spring 自动注册一些消息转换器(HttpMethodConverter)不过类路径下要有对应转换能力的库 如:Jackson Json processor、JAXB 库
- 请求传入,
@RequestBody以及 HttpMethodConverter,把来自客户端的 json 数据转化成 Java 对象。
例子代码
@SpringBootApplication- 配置类
@Configuration @ComponentScan
- 配置类
@RestController@Controller- 请求响应,JSON 编解码(序列化)
- 健康检查
- 添加 actuator 依赖,可以获取很多端点,如 health
运维实践
- 代码和测试脚本等都在源代码库中
- 指定 JAR 依赖的版本号
- 配置与源代码分开放,配置当中有很多常变化的、敏感的信息
- 已构建的服务是不可变的,不能再被修改
- 微服务应该是无状态的
- 并发,通过启动更多的微服务实例横向扩展,多线程是纵向扩展
基于NACOS的数据配置
微服务开发配置
添加依赖
<dependency>
    <groupId>com.alibaba.cloud</groupId>
    <artifactId>spring-cloud-starter-alibaba-nacos-config</artifactId>
</dependency>
在 bootstrap 中定义 nacos 访问地址,以及可能的文件后缀(yml、properties)、服务名
spring:
  application:
    name: licensingservice
  profiles:
    active:
      default
  cloud:
    nacos:
      config:
        server-addr: nacos-headless:8848
        file-extension: yml

management:
  endpoints:
    web:
      exposure:
        include: "*"
  endpoint:
    health:
show-details: always@Value指定要获取的属性名@RefreshScope实时刷新,可以获取到来自 nacos 的最新修改
// nacos 变更后微服务可以及时获取最新数据
public class ServiceConfig {
// 指定 key 名,从 nacos 获得属性值
private String exampleProperty;
public String getExampleProperty() {
return exampleProperty;
}
}
dataId 的完整格式
${prefix}-${spring.profiles.active}.${file-extension} |
prefix 默认为 spring.application.name 的值,也可以通过配置项 spring.cloud.nacos.config.prefix 来配置 spring.profiles.active 即为当前环境对应的 profile。
file-exetension 为配置内容的数据格式,可以通过配置项 spring.cloud.nacos.config.file-extension 来配置。 目前只支持 properties 和 yaml 类型。
基于NACOS的服务注册与发现
服务发现的好处
- 快速水平伸缩,而不是垂直伸缩。不影响客户端
- 提高应用程序的弹性
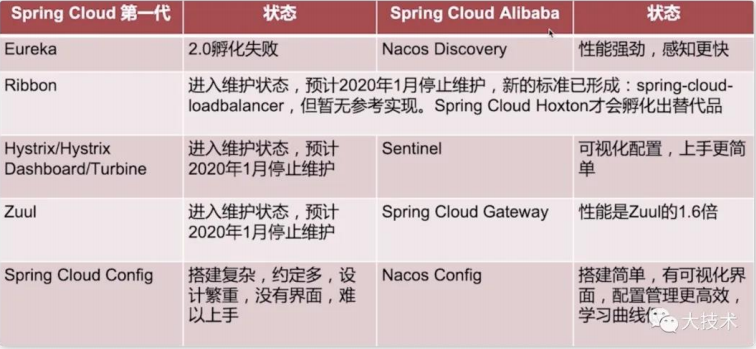
Spring Cloud Alibaba
使用到的starter依赖
- 服务配置:
com.alibaba.cloud, spring-cloud-starter-alibaba-nacos-config - 服务注册:
com.alibaba.cloud, spring-cloud-starter-alibaba-nacos-discovery - 客户端负载均衡:
org.springframework.cloud, spring-cloud-starter-loadbalancer - 简化客户端调用:
org.springframework.cloud, spring-cloud-starter-openfeign
调用服务的三种方式
- Spring DiscoveryClient
- 使用支持 LoadBalanced 的 RestTemplate
- 使用 OpenFeign (@FeignClient):OpenFeign 是一款声明式、模板化的 HTTP 客户端, Feign 可以帮助我们更快捷、优雅地调用 HTTP API
后两种方法自动做负载均衡,因此一般不建议使用第一种(只在测试时使用),更常见的是第三种。我们定义的负载平衡策略(轮询、随机等)能影响到后两种方式。
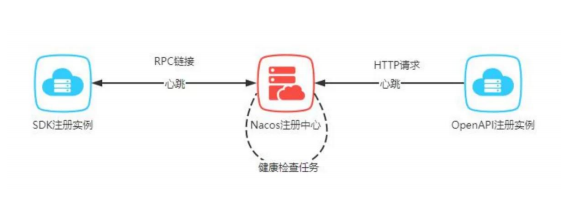
健康检查
- 临时实例的客户端主动上报机制, 临时实例每隔 5s 发送一个心跳包给 Nacos 服务器 端
- 学习参考(源码剖析):https://zhuanlan.zhihu.com/p/386647120
- 客户端调用如何应对服务状态不能及时更新,请参考学习:https://mp.weixin.qq.com/s/fDtcQD1EL-NgVV1BMiPx4g
- 永久实例的服务端反向探测机制,永久实例支持 3 种探测协议,TCP、HTTP 和 MySQL,默认探测协议为 TCP 也就是通过不断 ping 的方式来判断实例是否健康 。
- 两种健康检查机制的学习参考:https://zhuanlan.zhihu.com/p/473494621
服务部署
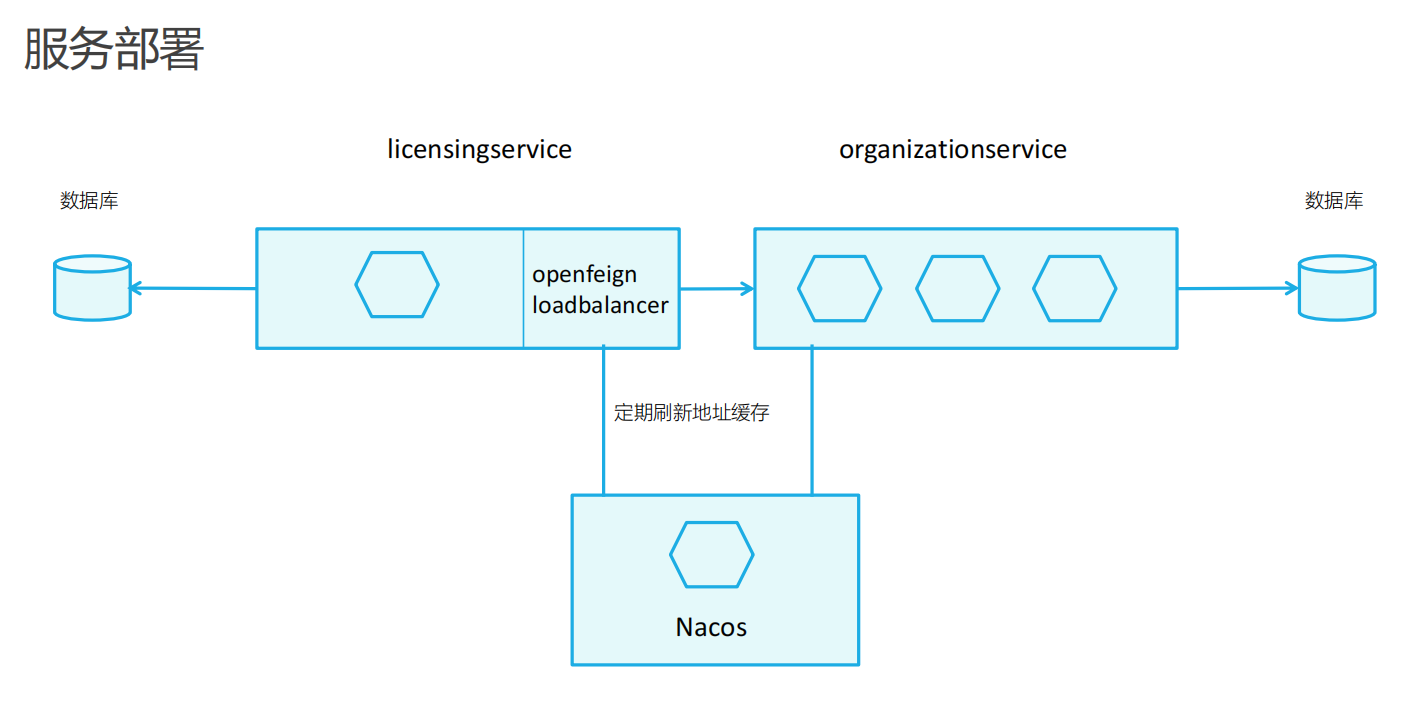
由 A 到 B,需要获得 B 的 IP 地址和端口号。不是 A 先把请求发给 Nacos,由 Nacos 进行转发,而是从 Nacos 获得 IP 地址,再直接和 B 进行通信。
如何使用 Nacos 实现服务注册与发现
添加依赖
<dependency>
	<groupId>com.alibaba.cloud</groupId>
    <artifactId>spring-cloud-alibaba-dependencies</artifactId>
    <version>2021.0.4.0</version>
    <type>pom</type>
    <scope>import</scope>
</dependency>
简化客户端调用
<dependency>
    <groupId>org.springframework.cloud</groupId>
    <artifactId>spring-cloud-starter-openfeign</artifactId>
</dependency>
服务注册
<dependency>
    <groupId>com.alibaba.cloud</groupId>
    <artifactId>spring-cloud-starter-alibaba-nacos-discovery</artifactId>
</dependency>
服务配置
<dependency>
    <groupId>com.alibaba.cloud</groupId>
    <artifactId>spring-cloud-starter-alibaba-nacos-config</artifactId>
</dependency>
客户端负载均衡
<dependency>
    <groupId>org.springframework.cloud</groupId>
    <artifactId>spring-cloud-starter-loadbalancer</artifactId>
</dependency>
在 bootstrap 中定义 nacos 访问机制
server:
  port: 8080
spring:
  application:
    name: organizationservice
  profiles:
    active:
      default
  cloud:
    nacos:
      config:
        server-addr: nacos-headless:8848
        file-extension: yml
      discovery:
        server-addr: nacos-headless:8848
启动类中添加注解
@EnableDiscoveryClient@EnableFeignClients@LoadBalanced
调用服务的方式(第三种:使用 OpenFeign
@FeignClient)实现接口
public interface OrganizationFeignClient {
Organization getOrganization( String organizationId);
}将接口注入服务并调用
public class LicenseService {
OrganizationFeignClient organizationFeignClient;
}
基于Sentinel的流控与熔断
定义资源的方式
- 代码直接定义
- 使用注解定义
- Spring Cloud 针对 URL 自动定义
强调:外置文件只能用来定义规则,不能用来定义资源
规则的种类
- 流量控制规则
- 熔断降级规则
- 系统保护规则
- 来源访问控制规则
- 热点参数规则
熔断策略
- 慢调用比例
- 异常比例
- 异常数
Sentinel组成
- 核心库(Java 客户端):不依赖任何框架/库,能够运行于 Java 8 及以上的版本的运行时环境,同时对 Dubbo/Spring Cloud 等框架也有较好的支持
- 控制台(Dashboard Dashboard):主要负责管理推送规则、监控、管理机器信息等
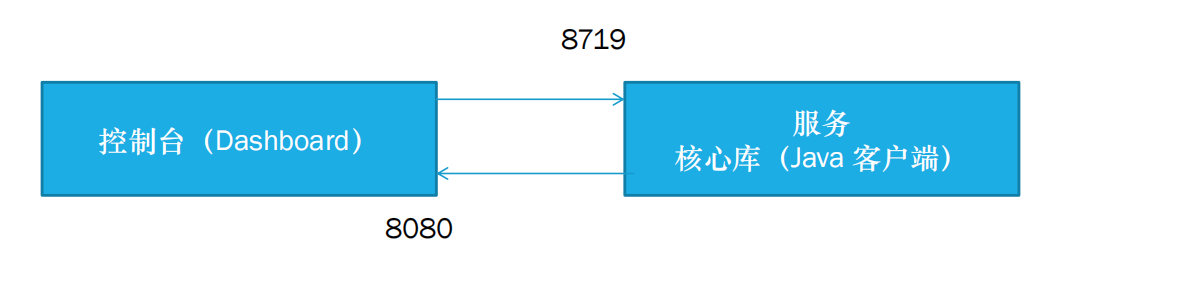
控制台不维护规则,通过端口号 8719 查询规则,如果服务故障则规则丢失。
往年简答题
WEB MVC 分层
- 模型(Model)代表数据控制器。数据的读取,插入,更新都是由模型来负责。
- 视图(View)是展示给用户的最终页面。视图负责将数据以用户友好的形式展现出来。
- 控制器(Controller)是模型,视图以及其他任何处理 HTTP 请求所必须的资源之前的中介
处理流程
- 控制器最先被调用,并被赋予外部输入
- 控制器根据外部输入向模型请求数据
- 模型从数据库获取数据并发送数据到控制器
- 控制器处理该数据并发送封装好的数据到视图
- 视图根据接到的数据最终展示页面给用户浏览
微服务相比于传统的单体业务有什么优势,为何关注微服务,有什么典型特征,单体有什么不足
优势:
- 易于开发与维护
- 独立部署
- 伸缩性强
- 与组织结构相匹配
为何关注微服务:
- 多人开发一个模块/项目,提交代码频繁出现大量冲突。
- 模块间严重耦合,互相依赖,每次变动需要牵扯多个团队,单次上线需求太多,风险大。
- 主要业务和次要业务耦合,横向扩展流程复杂。
微服务典型特征:
- 应用程序分解为具有明确定义了职责范围的细粒度组件
- 完全独立部署,独立测试,并可复用
- 使用轻量级通信协议,HTTP 和 JSON,松耦合
- 服务实现可使用多种编程语言和技术
- 将大型团队划分成多个小型开发团队,每个团队只负责他们各自的服务
单体应用程序的不足:
- 数据库的表对所有模块可见
- 一个人的修改整个应用都要重新构建、测试、部署
- 整体复制分布式部署,不能拆分按需部署
服务注册与发现的好处
好处:
- 快速水平伸缩,而不是垂直伸缩。不影响客户端
- 提高应用程序的弹性
部分文字参考熊佬博客:服务端开发-期末复习 | EagleBear2002 的博客